Sunday, August 31, 2014

Teacher Planner - DIY

Detailed Binder set-up video

After looking at several planners available for teachers, I came to the realization that it would be easier to just create my own. There are a lot of amazing lesson plan binders out there as well as printables for teachers, but I could never find one that would house everything I wanted to have in one place.

I opted for the mini 3 ring binder.  I have used full sized binders in the past, but as my main teaching planner, they would become too heavy for me to carry back and forth between home and school.  I now have a comprehensive planner I can use daily and transport with ease.  


Using Power Point, I changed the paper size to 8.5 x 5.5, which is 1/2 of a sheet of letter sized paper.  I reworked my forms and lesson plan templates to fit on these smaller pages. 


Section 1: Business

1) In this section I have a calendar spread of a school year on 2 pages where I plan on keeping track of my absences, professional development and per session work. 
2) Seating Chart
3) Parent phone #'s
4) Parent Call Log
5) Parent Communication Form


Section 2: Calendar

1) Monthly Calendar
2) Undated Weekly Planner
3) Section for notes and to do's

Section 3: Lesson Plans

I created a two sided generic template to use for more detailed planning if necessary.

Section 4: Assessment

1) Homework Log where I keep track of the assignments I give out.
2) Grade tracker where I track the homework, classwork, tests, quizzes, and projects.
(Each marking period is a different color)

Section 5: Standards

Using the common core standards, I created a tracker to help me to monitor the students' progression through the different standards.

In the very back of the binder, I have sheet protectors which contain conference sheets, and daily assessment sheets.  


Thanks for stopping by.  Until next time...

 photo Christinepng.png

Sunday, August 17, 2014

Teaching: Start the Year Off Right!

BACK TO SCHOOL!

As the summer winds down here in NY, the teachers are inevitably thinking about getting back into the classroom.   For myself, I have found that if I at least have a few key procedures, handouts, and files in place,  I can begin the year feeling organized and prepared.  The items below in red are samples, suggestions, and / or printables.  Feel free to use any or all that you find useful.


Procedures and Arrangements to Consider:

This file box has files labeled 1-31 to correspond with
 the days of the month.  I temporarily put extra handouts
 in file marked with the date they were used in class.
If a student is absent they know where to go
 to get missing handouts.


  • Entering and Exiting the classroom
  • Checking Homework Completion
  • Correcting homework
  • Returning homework
  • What if a student is absent?
  • Borrowing books
  • Borrowing supplies
  • Bathroom Procedures
  • What happens when a rule is broken? (Consequences have to be clear and spelled out)
  • Storing homework / classwork/ projects / tests 
  • Storing Supplies and Manipulatives
  • Room Arrangement -  groups?  how many per group?  centers?  storage?  traffic flow? during tests?

Handouts / Things you should have:


File Category Suggestions:

  • School Memos
  • Calendars
  • Professional Development (articles / handouts)
  • Meeting Notes
  • Extra Class Lists
  • Testing Information (Dates / Procedures)
  • Test Scores (Student data)
  • Extra Parent Handouts
  • Notes from parents
  • Copies of notes to parents
  • Office Business ( Book lists / furniture inventory / teacher's choice receipts)
  • Schedules
  • Special Needs Information
  • Standards
  • Curriculum Maps / Unit Plans
  • Copies of Important emails
  • Per Session Papers
  • TO -DO file (requires attention and response)
  • Copies of Anecdotals

Click HERE to create file labels using template 5266 or AVERY 5066


 photo Christinepng.png

Friday, August 1, 2014

My Malden...Personal, Purple, Paradise

I wanted to do a post about my Malden set up because it has already gone through so many changes in the few short months that I have had it.  


My Dashboard...  I basically just have clips, cards with washi tape and some project life cards in the front slots.  In the long pocket, I made a decorative envelope to hold my extra stickers.  I usually put cash in the slit in front of the zipper.


 Monthly :   I use the month on two pages from Day Runner.  I like that the months are tabbed and that the pages are nice and thick.  My monthly divider is from Reman Design Studio - Etsy


Weekly:  I use the week on two pages from Filofax.  The cream colored week on two pages came with my planner and I like the paper quality.  


Daily:  I have not yet settled upon a daily insert that I can actually use long term.   I have created 3 different inserts and I am beginning to think that I don't need daily inserts at all.  (Daily divider by Reman Design Studio on Etsy)


To Do's and Projects:  I created these inserts to help manage the many things that I have going on.  Each project has so many components that I need to see them listed out.


Goals and Lists:  These two sections just contain blank paper for now.  The paper for the goals is Filofax lined colored paper, and the pages for my lists I created using stamps from Heidi Swapp. I also made the dividers from a paper pack called Amy Tangerine from American Crafts (found at Michaels).  


Capture:  I created this divider to be a small folder that houses all of my sticky notes.  In the center of the divider, I added a piece of transparency paper to be able to fit more inside.  This section closes with a small piece of Velcro on the tab.   


Finances:  Since I also used my personal as a wallet, I have a section for my finances.  I created an insert to keep track of the bills I pay bimonthly.  It folds into 3 sections.  


I keep my credit cards in the card holder with a post it flag completely covering the information on my card.  (The flag is on the plastic so that I can easily remove the card and use it.  I place my receipt in the pocket folder immediately after the purchase.  


On the other side of the folder I keep my coupons.  The final dashboard stores graph paper for me to write down my shopping list or items to pick up on errands.  


Finally, we arrive at the back cover. I keep a small thin notebook that I picked up from Staples in the back pocket.  I write down all of my daily purchases.  Once they are recorded in here, I can remove the receipt and either file it, or throw it away.   The little owl is a magnetic clip that I made.  He stay back here until I need him.


If you have any questions about my set up, inserts or any items that you see please leave a comment below.   Until next time...
 photo Christinepng.png

Friday, July 25, 2014

Filofax? What on Earth is a Filofax?


Yes, it's true.  Until about 3 months ago I had never heard of a Filofax.  I also had no idea how it would impact my life.  I came across them when I was in one of my organizing moods and was looking on YouTube for inspiration.  I kept bumping into Filofax decorating videos.  I was sold 5 minutes into the first video (by My_Planner).  The idea that this planner (or any other) could actually corral all of my favorite things in one place was amazing!  


Making Lists
Writing To Dos
Using Post-its
Decorating
Scrapbooking
Citing Quotes
Using Stickers
Making dividers
Planning
Writing Notes
Creating Dividers
Creating all types of graphic organizers!


Once I had decided on the right Filofax for me I had to wait until one became available.  In the meantime, I had bought a very cute notebook as a substitute until I got the real thing.


Then it arrived.  A personal Malden,  in all of its purple glory...so soft, so beautiful...but smaller than I am used to.  At first I thought it might be too small and I would miss using my notebook, but I adapted and made it work for me.  I copied the cover of the notebook and use it as a dashboard right in the front.  So after several trips to Target, Staples and Michaels, and experimenting with many different inserts, I have a set up that I am very happy with!


This simple discovery...filofaxing....gave me a renewed sense of excitement and reminded me of all of the passions that I had been neglecting for a long time. I have more energy now than I know what to do with and the creative juices are flowing.  I was at the right place at the right time!

 photo Christinepng.png

Sunday, July 13, 2014

5 Quick Tips for Setting Up the Classroom

As you get ready for a new school year, a few quick tips can help to make your life a bit easier for the coming year.

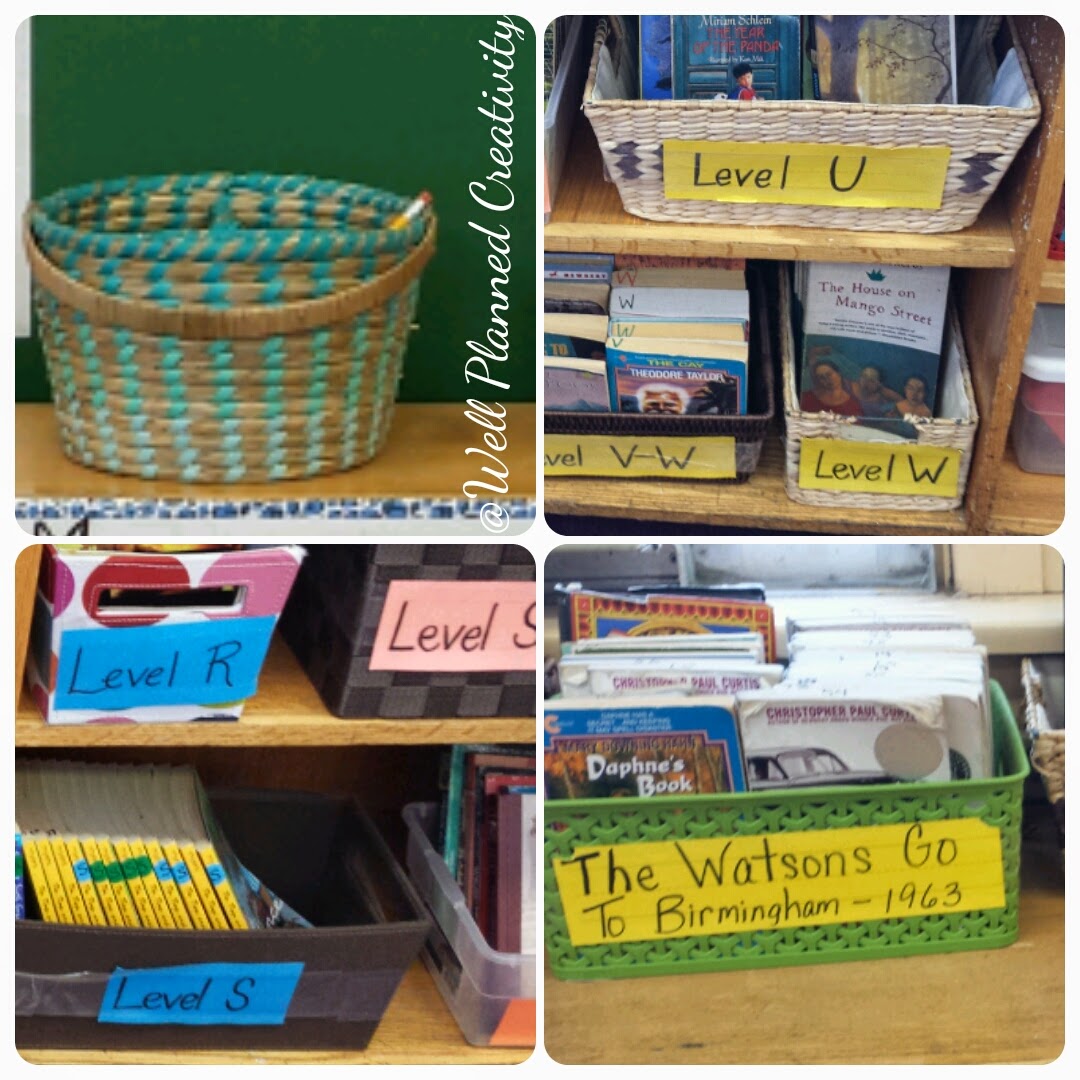
#1  Use Plenty of Baskets

Baskets can serve two purposes...they contain items which make them transportable, and they can add a homey feel to an otherwise sterile classroom.  Wicker baskets work well for storing books, folders, and supplies.  Michael's regularly has sales on wicker baskets.  Buy a few every year to build up your supply.


#2  Label Everything!

Take time to label all of the baskets and bookcases in the room.  It creates a sense of organization, students know exactly where to find things, and ...more importantly...where to return things.  Be consistent with the size and style of the labels for a more unformed look.  Colored index cards covered in clear packing tape works well and keeps labels clean.


#3 Organize Bulletin Board Letters
Nothing is more frustrating when trying to build a bulletin board display than hunting, separating and cutting letters.  I took a small file box and added labels to the tabs and sorted all of my letters, numbers, and symbols. I have about 6 different packs of letters inside and I still have plenty of room for more.   It is a bit time consuming at first, but it will make your life so much easier.  (I had a few students work on this for me at the end of the school year.)  Now I can easily locate the letters that I need and see what styles I have available in a particular letter at a glance.  I bought this accordion file box at staples.


#4  Managing Extra Copies
If you are like me, I always either have too many copies or cannot find my extra copies when I need them.  I finally found a system that worked for me.  I got a large binder and a crate.  I filled the binder with sheet protectors and numbered them.  I filled the crate with hanging files and numbered the tabs.   Now when I have extra copies, I place 1 copy into the sheet protector and the rest of the copies in the corresponding hanging file.  Students can easily find the exact copy they need when they return from an absence or have misplaced their original one.


#5  Have a Folder for Each Day of the Week 
Honestly, I have never planned so well that I have every thing that I need for a full week ahead of time.  However, I may make some copies ahead of time that I know I will use on a certain day. Or, If I run out of time in my lesson, I can place the unfinished activities in the next day's folder.  If you are together enough to forward plan for a full week, in each folder you can have a copy of your lesson plan, necessary handouts, a list of conferences that you would like to have, homework sheets, notes and anything you would like to remember for a particular day.

 photo Christinepng.png

Friday, June 20, 2014

My First Post

        I have always loved paper.  As a child my favorite time of year was always the fall because that meant I got to buy new school supplies.  Nothing made me happier.  Of course back then, there were not many stores devoted to selling office/school supplies, so you had to take whatever there was in the back of the drugstore.  Nevertheless, I would be thrilled.  

     Fast forward a few years and fall is still my favorite time of year because I am a teacher.  The pure excitement and anticipation of a fresh start every year is something that I do not take for granted. New students, new classroom set-up, new bulletin boards, new binders, new planners and definitely new school supplies!  Lots and lots of school supplies!   

    Because of this passion, (or obsession) the teaching profession suits me perfectly.   I enjoy the part of the job that many would rather do without... PAPERWORK!  I love all of it.  As a middle school teacher managing multiple classes, I love coming up with creative ways to manage the flood of paper that easily accumulates.  I have so many ideas running around in my head that I will start to dump them here.  Maybe someone will benefit from what I find has worked for me.  I hope to share practical teaching tips, crafting projects, and organizational ideas that people can take and use immediately.  
'Till next time...